Welcome
To start integrating BoldWallet™, you need a boldwallet™ account.
SignUp now
We need two vital things which are Our Masterkey and Servicekey.Lets get it...
- On Boldwallet Dashboard, Goto Integrations and click Add application
- Add Integrations
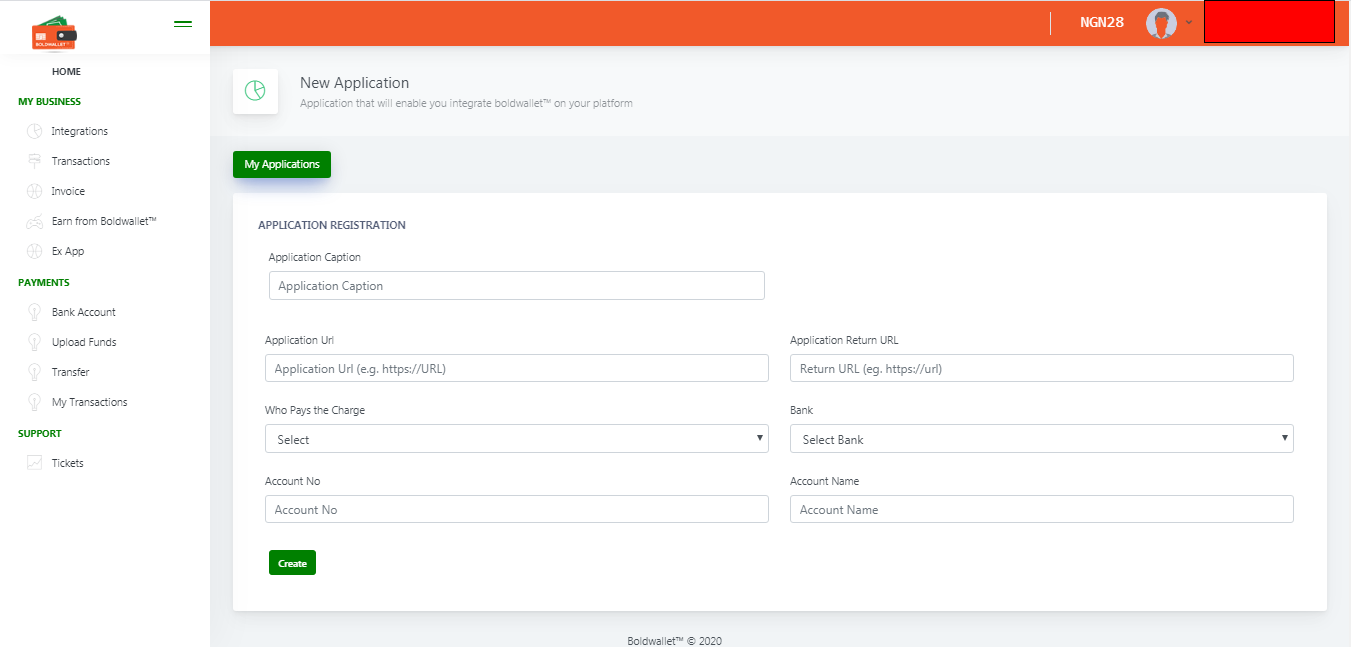
PARAMETERS
1. Caption
2. Application URL: this the full application (e.g https://your url and not your url) of your url NB Boldwallet uses this url for confirmmation in case fallback when there is low network connectivity
3. Application Return URL: this is the full URL where boldwallet returns the user after every transaction process .Be it cancelled transaction ,declined or successfull transaction. this is a compulsory field but Boldwallet does not apply this plugin transaction processing such as wordpress
4. Who Pays the Charge: who bears the charge of the transaction
5. Bank Reconciliation Bank
6. Account Name Reconciliation Bank Name
7. Account No Reconciliation Account no
- Application Listing

Upon Registeration of an application , the application is under test mode, but when you want to go live you can switch it to Live Mode
Our Aim has been achieved, your Masterkey and Service ID has also been created
Validations Errors
Boldwallet™ Response is classified into three distinct variables
- "3" meaning Declined - this is returned when incorrect card details are sent (e.g wrong expiry date, cvv too short, invalid card number…), most of these errors can be determined before the cards are sent to the server/issuer.
- "2" meaning Cancelled - this is returned when the transaction is sent to the issuer but returns a message other than successful.
- "1" meaning success - this is returned when the transaction has succeeded.
Validation errors will be sent in the format:
{
status: "0",
status_request :"0",
information:"Result Found", message: "Validation error occured" ,
CustomerFirstname: "" ,
CustomerEmail : "",
CustomerLastname: "" ,
currency: "" ,
Amount:"" }
The field can either be number ,expiry or cvv .
Charge errors will be sent in the format:
{
status: "0",
status_request :"0",
information:"No Result Found",
message: "Validation error occured"
}
The success response of the promise will be invoked for either a successful charge or one that requires authentication.
A successful charge will send a response that looks like this:
{
status: "0",
status_request :"0",
information:"Result Found",
message: "Validation error occured" ,
CustomerFirstname: "" ,
CustomerEmail : "",
CustomerLastname: "" ,
currency: "" ,
Amount: "",
bwuniqid:"",
}
Checkout
boldwallet.js makes it easy to collect card details on your page by redirecting to a 3D Secure link without having the information touch your server. We do this so that we will handle the complex payment flow and give you the details of the transactions after processing.
- HTML page with functional html tags
Boldwallet™ JS into your page
<script src="https://bwalletpay.com/api/1.2/api.js"></script>
Before sending card details to boldwallet™.js, we expect you to initialize the transaction on your client side. Pass the customer's email, amount and any other relevant data to us, and we will redirect to 3D processor for card processing
// Initialize boldwalletObject object
var boldpaidSetup = {
masterkey: "11619935",
servicekey: "BW13",
email: "[email protected]",
firstname: "EMEKA",
lastname: "EZEUKO",
description: "Description Desds",
phonenumber:"08068094681",
currency:"560",
amount:"100",
bwuniqid:"unique Transaction id ";
}
<button onclick="paynow()"> Paynow</button>
<form action="https://bwalletpay.com/processor/regtran2" method="post">
<input type="text" name="description" required />
<input type="text" name="total" required/>
<input type="text" name="customerFirstName" required />
<input type="text" name="customerLastName" required/>
<input type="text" name="customerEmail" required/>
<input type="text" name="customerPhoneNumber" required/>
<input type="text" name="currency" required/>
<input type="text" name="servicekey" required/>
<input type="text" name="masterkey" required/>
<input type="text" name="bwuniqid" required/>
<button type="submit">Submit</button></form>
![]()
After payment processing the processor takes the user back to clients return website url page.
Sample code available!
You will not need to worry about this too much, just download our sample javascript from https://github.com/PREMIUMESOWP/boldwallet then design the html screens for each type.
N.B: After succefull validation, its adviced to perform a check to confirm the status of the transacions as shown here
Boldwallet™ Button
Boldwallet button simply integrates with your website to show predefined forms as designed by boldwallet.
The boldwallet_button
must be defined to capture the necessary functions and contains 4 different currency selections

- HTML page with functional html tags
Boldwallet™ JS into your page
<script src="https://bwalletpay.com/api/1.2/api.js"></script>
var boldwallet_button = {
masterkey: "11619935",
servicekey: "13",
bwuniqid: "13",
description:"Welcome Nigeria"
}
<button onclick="btpush()"> Paynow</button>
After payment processing the processor takes the user back to clients return website url page.
Sample code available!
You will not need to worry about this too much, just download our sample javascript from https://github.com/bwallet/bwalletpayJS-Sample-code then design the html screens for each type.
N.B: After succefull validation, its adviced to perform a check to confirm the status of the transacions as shown here
Getting Started
This shows you how to accept payments super fast with boldwallet™
This is a five part series that attempts to guide you till you conclude integration.
While we used PHP in this series, attempt is made to focus on pseudocode so you can apply to any language.
Part 0: Prerequisites
Part 1: Transaction Parameters
Part 2:
Boldwallet™ Button or
BoldWallet™ Checkout
Part 4: Verify Payment
Part 5: Menu menu.
Prerequisites
Before starting integration, be sure to:
-
Check our acceptable use policy . If you have any questions about your business and its acceptability please send an email to [email protected] . Our team is available to discuss and clarify any issues.
-
Boldwallet API is dependent on JQuery API and appends JQuery library when none avalaible upon request
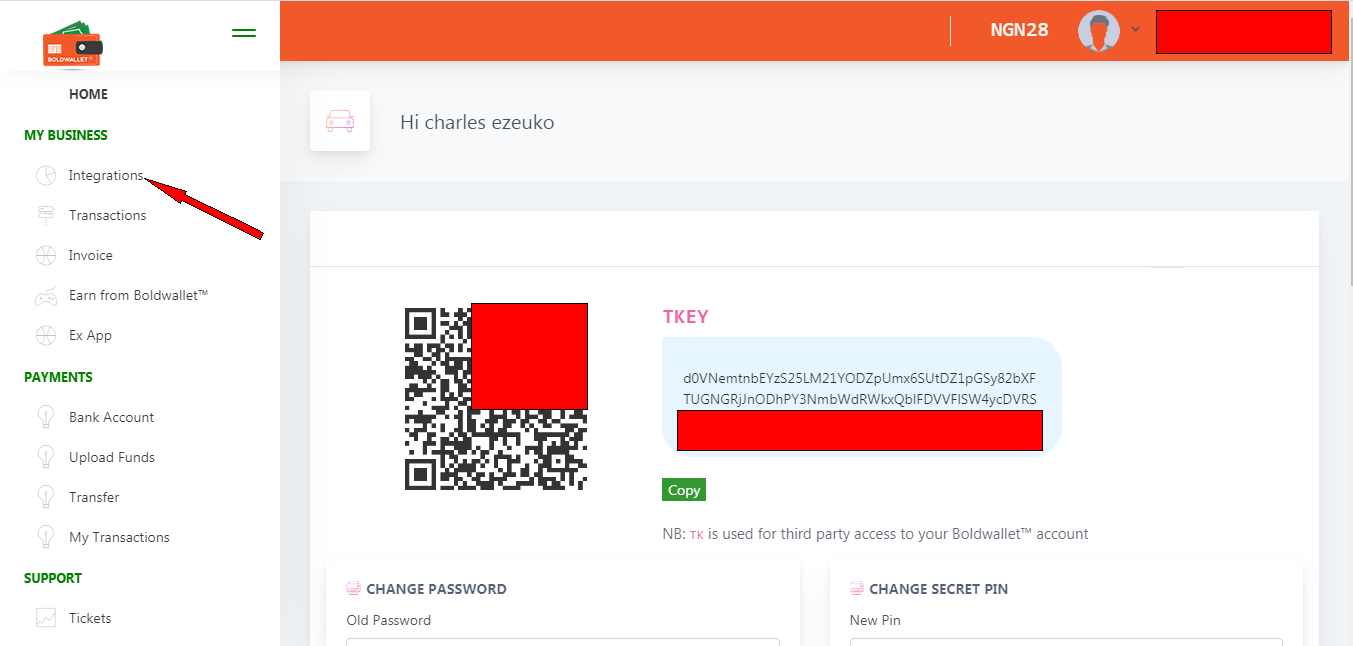
API Keys
This section describes what API keys are and how to retrieve them;
Boldwallet™ authenticates your API requests using your account’s API keys. If you do not include your key when making an API request or use one that is incorrect or outdated, Boldwallet™ returns a null to your response.
All API requests exist in either test or live mode, and one mode cannot be manipulated by data in the other. To get your live and test API keys sign up here
There are also two types of API keys: publishable and secret.
-
Service Key keys are meant solely to identify your account with Boldwallet™ , they aren’t secret. In other words, they can safely be published in places like your Boldwallet™ JavaScript code, or in an Android or iPhone app. Service keys only have the power to create a transaction.
-
Master Key keeps track of your transactions and time when it was performed.
NB: Master Key can Service keys are used to perform crucial Transactions Request to BoldWallet™
Obtaining your API Keys
Your API keys are available in the Dashboard by navigating to Integrations - >
If you cannot see your API keys in the Dashboard, this means you have not created any application on the platform..
![]()
Test and live modes
The test and live modes function almost identically, with a few necessary differences:
- In test mode, payments are not processed by card networks or payment providers rather by the test environment enlosed with BoldWallet™ platform and only recognized the test cards
Earn From Boldwallet
We track the users you refer to us using ref_user parameter, so you earn for every transaction they perform using their Masterkey and servicekey provided the amount is more than NGN2500
ref_user parameter: YOUR_USERNAME
Its very simple to use and integrate.
N.B: YOUR_USERNAME is your boldwallet username